Color Camp Summer Craft Series: Fruits and Veggies Stand Sale
.ashx?la=en)
Merriment Design
We’ve reached Week 3 of Color Camp!
Color Camp is a weekly series of summer paper crafts that kids and caregivers can make together. I designed a pretend farmer’s market playset for you with four parts:
Week 1: Fruit friends paper dolls
Week 2: Market stand from a upcycled milk or juice carton
Week 3: Fruit and veggies to sell at the stand
Week 4: Pretend money
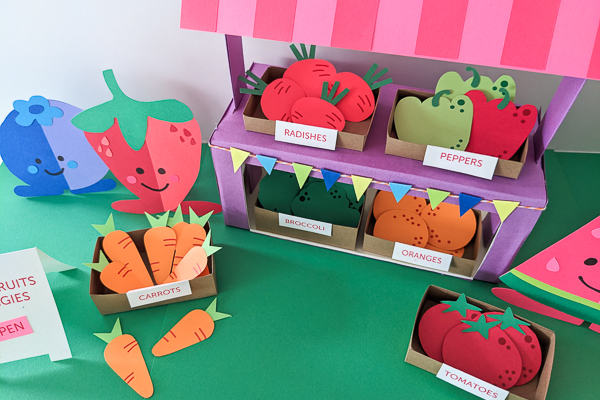
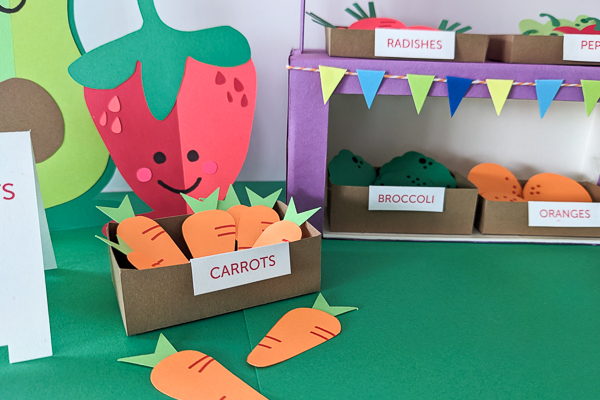
In Week 3, we’ll make fruit and veggies to sell at our farmers market stand. I’ve designed lots of fruits and veggies for you to print and cut: Carrots, radishes, tomatoes, peppers, oranges, and broccoli.

Want even more?? Have kids draw their favorite fruits and veggies onto ASTROBRIGHTS cardstock paper and cut them out.
This is a great craft for practicing cutting skills. Here are three tips that I like to use when cutting paper:
- Cut loosely around pieces first to make the paper easier to maneuver in step 2.
- Turn the paper, not the scissors, as you cut. Scissors should remain in the same comfortable hand position as you turn the paper left and right to cut along the lines.
- Save your colorful scraps! I keep a box of my scraps for future paper crafts.
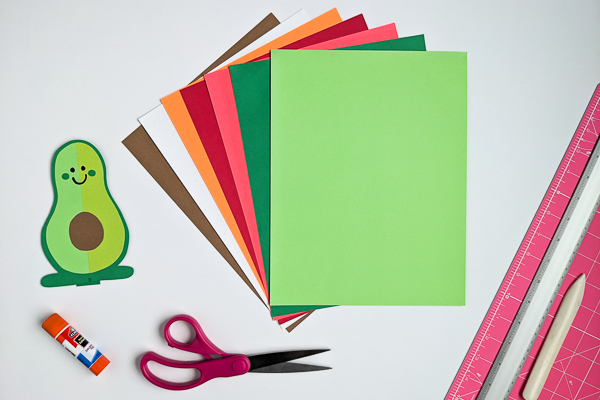
Supplies for Week 3:
- Kathy Beymer’s printable fruits and veggies printable template (PDF)
- ASTROBRIGHTS® Spectrum assortment cardstock paper pack and ASTROBRIGHTS® Naturals assortment cardstock paper pack
- Good paper scissors
- Glue stick
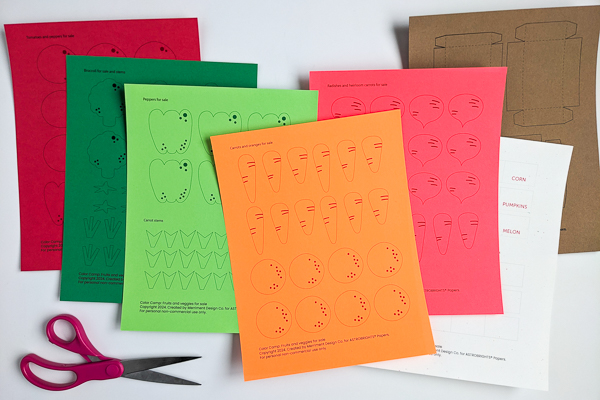
Step 1: Print my fruits and veggies templates onto ASTROBRIGHTS cardstock paper. Here are the colors that I used:
- Carrots: Cosmic Orange™
- Green peppers and carrot stems: Martian Green™
- Radishes and heirloom carrots: Rocket Red™
- Tomatoes and red peppers: Re-Entry Red™
- Broccoli and stems: Gamma Green™
- Wooden crates: Grocer Kraft
- Signs: Stardust™ White
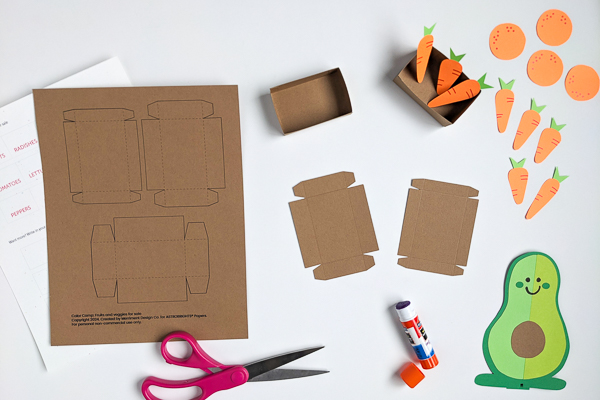
Step 2: Cut out the fruits and veggies pieces.

Step 3: Glue stems and greens onto veggie tops. Set aside to dry.
Step 4: Cut out and assemble crates by folding along the dotted lines and gluing the flaps. For crisp folds, just run a bone folder or kitchen butter knife along a ruler’s edge to crease the paper before folding.
Step 5: Cut and fold fruit and veggie signs.

Step 6: Fill the crates with fruits and veggies. Add signs to the crate fronts.
Join me next week as we turnip the excitement by making some berry special paper money to buy the fruits and veggies at our Farmer’s Market playset!
Kathy Beymer
Instagram: @kathybeymer
Pinterest: @merrimentdesign